

If you’re an IT professional and find yourself struggling with setting file system permission for your organizations, you’re in luck. Managing NTFS permissions using a GUI is time-consuming especially when working with many users or groups. Luckily, we have PowerShell to make it all better. How? The Microsoft.PowerShell.Security module.
Not a reader? Watch this related video tutorial!PowerShell has two cmdlets specifically for working with ACLs called Get-ACL and Set-ACL. These two cmdlets can retrieve and assign any number of NTFS permissions which you’ll learn all about in this tutorial. If you want to become more efficient and immediately useful in managing NTFS permissions, keep reading.
No time to read? Not a problem! Watch this companion video from TechSnips.io‘s Anthony Howell below:
Manage and Report Active Directory, Exchange and Microsoft 365 with ManageEngine ADManager Plus. Download Free Trial!
Prerequisites
To follow along with the examples in this tutorial, you need:
- PowerShell 7 or Windows PowerShell 5.1
- A basic understanding of NTFS file and folder permissions
Creating a Files/Folders to Test With
This tutorial will be built around a simple “lab” or a single folder. You’ll learn how work with NTFS permissions in PowerShell from the ground up; no extra work needed on your part.
- To begin, open a PowerShell session as Administrator.
- Create an empty folder called Share somewhere on your filesystem. In the following examples, let’s assume that folder is located at C:\Share. This will keep the examples shorter and easier to follow. You can create this directory by copying the code below:
New-Item -ItemType Directory -Path 'C:\Share'3. Create a folder called C:\Share\Assets.
New-Item -ItemType Directory -Path 'C:\Share\Assets'4. Create a file called client_list.txt in the C:\Share folder.
New-Item -ItemType File -Path 'C:\Share\Client_list.txt'5. Create a file called client_projects.txt in the C:\Share folder.
New-Item -ItemType File -Path 'C:\Share\Client_projects.txt'6. Next, assign a variable for the Share folder path. Creating variables cuts down on typing and makes the path easier to reuse. Assuming you are using C:\Share, copy the following code example into your PowerShell session:
$dir = 'C:\Share'7. Press Enter. You now have an empty directory and saved that path as a variable.
Viewing NTFS Permissions With Get-Acl
PowerShell allows you to quickly view NTFS permissions using the Get-Acl cmdlet. In the following sections, you will learn how to use the cmdlet to view NTFS permissions for a file or folder.
An access control list (ACL is a list of access control entries (ACE). Each ACE in an ACL identifies a trustee and specifies the access rights allowed, denied, or audited. The security descriptor for a securable object can contain two types of ACLs: a DACL and a SACL.
Displaying NTFS Permissions
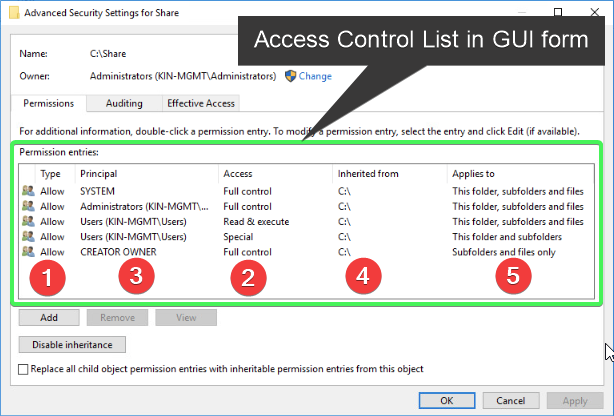
Traditionally, you would view an ACL by right-clicking on the C:\Share folder, clicking on Properties, selecting the Security tab, and clicking on the Advanced button. You can see an example of how the GUI displays permissions below.

The above example has some permission entries and properties numbered. Examine them closely as you will see the comparison later in this section.
Using the directory that you created earlier, display the current NTFS permissions for the directory by using Get-Acl.
Get-Acl -Path $dirYou should now see the path, owner and access level details in the following screenshot.

The Access property shown in the above screenshot contains additional information regarding the ACL, but it scrolls off the screen as shown by the triple dots at the end of FullControl above. There’s a better way to view this property by enclosing the previous command in round brackets or parenthesis to view Access object properties. Only look for the Access property on this object by running the below code.
(Get-Acl -Path $dir).AccessThe above command can also be expressed using the
Accessobject and using the-ExpandPropertiesparameter:Get-Acl -Path $dir | Select-Object -ExpandProperty Access
As shown in the following screenshot, the output is wrapped to make the command easier to see individual Access properties:

Viewing access properties in the above manner can make the terminal output scroll down the screen fast if you have many Access Control Entities (ACE). Each entity contains FileSystemRights, AccessControlType, IdentityReference, IsInherited, InheritenceFlags, and PropagationFlags properties. To make this all a bit more readable, pipe the objects to Format-Table -AutoSize. Run the following command.
(Get-Acl -Path $dir).Access | Format-Table -AutoSizeAs you can see in the below screenshot, the access properties are cleaner and more organized when using Format-Table -AutoSize:

Examine the properties and column number. Notice these are the same properties that you saw in the GUI at the beginning of the tutorial.
Filtering Access Objects
There are times which you will want to be more precise when discovering NTFS permissions. To do so, you can filter for a specific ACE, or find particular results that have inherited or explicit NTFS permissions within an ACL using PowerShell. Instead of scrolling the terminal window with your eyes line by line, you can use the Where-Object cmdlet to do some filtering.
The code example below filters for objects not inheriting NTFS permissions. This is done by using Where-Object with the -Not operand looking at the current object in the pipeline $_. member object property of IsInherited , which denotes if the ACE is the result of inheritance and is not explicitly set:
(Get-Acl -Path $dir).Access | Where-Object {$_.IsInherited -eq $true} | Format-Table -AutoSizeRemember to pipe objects to
Format-Table -AutoSizeor the output will scroll down the screen. Make this a new habit; you’ll thank me later!
Using the code below, replace 'USERNAME' with another username to see specific results:
(Get-Acl -Path $dir).Access | Where-Object {$_.IdentityReference -like 'USERNAME'} | Format-Table -AutoSizeBelow is an example of what the results could look like:

The above example shows all ACE’s which the IdentityReference property is the user or security group assigned permissions.
Go ahead and practice what you’ve learned so far about
Get-Acl. Examine some different files and folders on your system. This will help you see many different security descriptors for different contexts. This will also help build some muscle memory.
Let’s kick things up a notch and assign NTFS permissions.
Modifying NTFS NTFS Permissions With Set-Acl
Now that you can view NTFS permissions, it’s time to assign and modify NTFS permissions using PowerShell. The Set-Acl cmdlet makes that possible. The following sections will demonstrate how to use this cmdlet in conjunction with Get-Acl to copy, modify inheritance, and remove NTFS permissions from a file or folder.
Copying NTFS Permissions
You may have a file or folder that contains the appropriate level of NTFS permissions that you need to use for a new ACL. You can save time by copying permissions from one file or folder to another.
Copying existing ACLs/ACEs can reduce human error when setting up NTFS permissions, assuming the security descriptor you are copying from is correct and appropriate for the destination in the first place. As the saying goes, “With great power comes great responsibility.”. Keep that in mind.
Consider the following screenshot. Here you are taking a look at the ACL for a file in C:\Share called Client_List.txt. The ACL has the correct level of NTFS permissions that you want:

Now, consider the next screenshot. This time you are taking a look at the ACL for another file in C:\Share called Client_Projects.txt. This file does not have the NTFS permissions you desire:

You need to copy the NTFS permissions from Client_List.txt to Client_Projects.txt. How can you do this? You will modify permissions by getting the ACL from Client_List.txt and then using the Set-Acl cmdlet with the -AclObject parameter. When you run the code below, the entire ACL from Client_List.txt is copied to Client_Projects.txt :
# Copy Client_list.txt Security Descriptors to Client_Projects.txt
$Acl = Get-Acl -Path 'C:\Share\Client_list.txt'
Set-Acl -AclObject $Acl -Path 'C:\Share\Client_Projects.txt'
As you can see in the numbered screenshot below, the Client_Projects.txt file now has the same security descriptors as Client_list.txt.
- Get an existing ACL from an existing file.
- Set copied ACL object to file or folder.
- Check that the ACL copied to the file or folder correctly.

You see now that the ACL is identical for the file Client_Projects.txt file as the Client_List.txt filein the IdentityReference column with AccessControlType set to Allow. You use the same technique for assigning NTFS permissions to folders too.
Adding NTFS Permissions
In the last section, you copied existing NTFS permissions from one file object to another. This time you are going to create NTFS permissions from scratch. This will allow you to assign NTFS permissions that will be assigned to a file or folder.
First, start assigning some variables to use for creating a new object used by Set-Acl. Doing it this way makes it a little easier to when it’s time to run the command. The code below builds the properties of an ACE that will become the NTFS permissions assgined to a file or folder:
# Create the ACE
$identity = 'domain\user'
$rights = 'FullControl' #Other options: [enum]::GetValues('System.Security.AccessControl.FileSystemRights')
$inheritance = 'ContainerInherit, ObjectInherit' #Other options: [enum]::GetValues('System.Security.AccessControl.Inheritance')
$propagation = 'None' #Other options: [enum]::GetValues('System.Security.AccessControl.PropagationFlags')
$type = 'Allow' #Other options: [enum]::GetValues('System.Securit y.AccessControl.AccessControlType')
$ACE = New-Object System.Security.AccessControl.FileSystemAccessRule($identity,$rights,$inheritance,$propagation, $type)
Next, assign one more variable which will get the initial ACL for the folder Assets . Then, using the AddAccessRule method member type, add an access rule using the $ACE variable:
$Acl = Get-Acl -Path "$dir\Assets"
$Acl.AddAccessRule($ACE)
You are now ready to add the newly minted ACE to the ACL of C:\Share\Assets. Now use Set-Acl to apply this new ACE to the proper directory:
Set-Acl -Path "$dir\Assets" -AclObject $AclNext, verify that the user you chose has the permissions to view the directory needed using the code below:
(Get-Acl -Path "$dir\Assets").Access | Format-Table -AutosizeRemoving NTFS Permissions
There will come a time when you need to remove NTFS permissions from a resource.
To remove NTFS permissions, start by getting the current ACL for the file or folder. In this example, that file is Client_Projects.txt:
$Acl = Get-Acl -Path "$dir\Client_Projects.txt"Now filter for the specific ACE you want to remove. You do this by calling on the $Acl member objects and piping those results to Where-Object and a few operands:
$Ace = $Acl.Access | Where-Object {($_.IdentityReference -eq 'domain\user') -and -not ($_.IsInherited)}Next, use the $Acl variable which contains the current ACL security descriptors, call the RemoveAccessRule method and pass the ACE object created above using the New-Object cmdlet to the RemoveAccessRule() method. This will remove the entry:
$Acl.RemoveAccessRule($Ace)It is important to remember that you have modified an existing ACL here and have not yet committed the changes.
Now to make those changes stick, run the Set-Acl cmdlet, providing parameters -Path and -AclObject with the appropriate values of "$dir\Client_Projects.txt" and $Acl . Once you’ve entered the command below, press Enter:
Set-Acl -Path "$dir\Client_Projects.txt" -AclObject $AclManage and Report Active Directory, Exchange and Microsoft 365 with ManageEngine ADManager Plus. Download Free Trial!
Summary
In this article, you’ve learned about managing NTFS permissions with PowerShell. You’ve learned about the two cmdlets, Get-Acl and Set-Acl, and what they do with NTFS permissions.
You’ve also learned how to use filters to target a specific ACE in an ACL for use in the above cmdlets. With a little practice, you’ll easily manage more NTFS permission requests than ever before.


